How to Use an Instant Pot Pressure Cooker
To use an Instant Pot pressure cooker, add liquid and food, lock the lid, set the valve to Sealing, choose a program, and press Start. When the cook ends, release the steam, wait for the float valve to drop, and open the lid away from you.
On this page (10 sections)
- What should you do before the first cook?
- How do you load the pot the right way?
- How do you lock the lid and seal the valve?
- Which button do you press, and what do the settings mean?
- How long does it take to come to pressure?
- How do you release pressure safely?
- How do you steam and lift food out without burning yourself?
- What should you do after the cook ends?
- What goes wrong most often?
- Which Instant Pot should you start with?
To use an Instant Pot pressure cooker, add liquid and food, lock the lid, set the valve to Sealing, choose a program, and press Start. When the cook ends, release the steam, wait for the float valve to drop, and open the lid away from you.
The order matters more than the button you press. Most problems with a new Instant Pot come from a lid that isn't locked, a valve left on Venting, or a pot with too little liquid to build steam.
What should you do before the first cook?
Run a water test first. Put 1 cup of water in the inner pot, lock the lid, set the valve to Sealing, and run a short pressure cook program as the manual describes.
This confirms the pot heats, seals, and releases steam properly before a real meal is riding on it.
Wash the inner pot and the lid parts in warm soapy water and dry them. Check that the silicone sealing ring sits fully in its groove under the lid.
A ring that slipped during shipping is the most common reason a first cook stalls.
Set the pot on a dry, level counter with clearance above it for steam. Keep the steam release away from cabinets and your face.
Never put the pot on a stove burner.
How do you load the pot the right way?
Put liquid in first and keep the total fill below the two-thirds line. The Instant Pot Duo 6 Qt has an inner pot with maximum fill markings, and those lines are a safety feature rather than a suggestion.
Use thin liquids such as water, broth, or thin sauce. Thick sauces can scorch on the bottom before the pot pressurizes.
If a recipe calls for a thick sauce, add it after the pressure cook instead.
Food should sit below the line too, especially anything that foams, like beans or pasta. For foods that expand, stop nearer the half mark.
How do you lock the lid and seal the valve?
Line up the lid arrows, turn until it stops, and turn the steam release valve to Sealing. The lid only locks one way; if it turns freely, it isn't seated.
On a Duo, the steam release is a switch on top of the lid. Sealing lets pressure build inside.
Venting lets steam escape, which is what you use to release pressure at the end.
The float valve, a small pin near the lid handle, pops up once pressure is reached. Until it rises, the pot is heating, not cooking.
Which button do you press, and what do the settings mean?
Pick the program that matches the food, then set the time and press Start. On the Duo, the named buttons cover pressure cook, slow cook, sauté, steam, rice, yogurt, and keep warm.
Pressure Cook and Manual give you full control: set high or low pressure and the minutes yourself. The one-touch programs preset pressure and time for soups, meat, beans, and similar dishes, and you can still adjust the time.
Use Sauté with the lid off to brown meat or soften onions before pressure cooking. It's also the setting that comes closest to a stovetop pan, because the tri-ply bottom of the stainless pot spreads heat for searing.
What is the Instant Pot Duo 6 Qt good for?
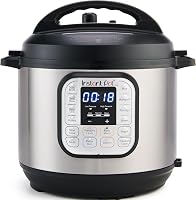
The Duo 6 Qt is the model most recipes are written for, and it covers the whole routine in this guide. It has 7 cooking functions, 13 one-touch smart programs, and an Easy-Release steam switch for venting at the end.
Instant Pot says the pot cooks up to 70% faster than slow cooking methods. The 6 qt size suits a family meal with leftovers for the next day.
How long does it take to come to pressure?
Add several minutes of heat-up time on top of the recipe time. The timer you set is the time at full pressure, not the total time the pot runs.
A small batch of soup might pressurize in 5 minutes; a full pot of cold stew can take 15 or more. The display often shows On or a rising countdown while pressure builds.
Don't lift the lid to check. Each time you break the seal, the pot has to start over.
If you're cooking something quick like vegetables, factor in that heat-up time before you promise dinner at a set hour.
How do you release pressure safely?
Use a quick release for vegetables and delicate foods, and a natural release for meat and stews. The method changes the result, so pick it on purpose.
Quick release
Turn the steam release valve to Venting and stand back. Hot steam shoots upward and can carry starchy water with it.
Keep hands and face clear.
Natural release
Turn off the pot and leave the valve on Sealing. Pressure falls as the pot cools, which takes 10 to 20 minutes.
Meat stays tender and doesn't seize up.
For a partial natural release, wait 10 minutes, then vent the rest. When the float valve drops, the lid opens.
How do you steam and lift food out without burning yourself?
Use a rack to hold food above the water, then lift the rack by its handles after pressure drops. Steaming works well for eggs, vegetables, and whole chicken.
The Sugaroom rack has long silicone handles that stay cooler to grip and let you lift a chicken or a pan out of the pot. Its 1 inch legs hold food above the water, and it folds flat for storage.
It fits 6 qt and 8 qt electric pressure cookers.
Measure your inner pot before you buy any insert. A rack that doesn't fit flat can tip a cake pan or block the lid from sealing.
What should you do after the cook ends?
Turn the pot off, release pressure, and clean the lid parts before the next meal. Leftover food on the sealing ring carries smells into the next dish.
Wash the inner pot, lid, and rack in warm soapy water; the stainless pot and the Sugaroom rack are dishwasher safe. Wipe the heating element area with a damp cloth only when the pot is unplugged and cool.
Dry the inner pot fully before storing it back in the base. A second pot makes back-to-back cooking easier, since you can start the next dish while the first pot is still soaking.
The Instant Pot Stainless Inner Pot 6 Qt is the verified spare for Duo 60 and similar 6 qt models. It's grade 304 (18/8) stainless steel with a tri-ply bottom, fill markings, and a polished surface that doesn't hold food odors.
If you're still deciding between this style of cooker and a stovetop model, our comparison of the pressure cooker vs instant pot weighs the trade-offs.
What goes wrong most often?
Most failures are a sealing issue, not a broken machine. Check the valve position, the lid lock, and the sealing ring before you assume the pot needs service.
- Valve on Venting: the pot never builds pressure, and the display sits on On.
- Lid not fully locked: steam escapes around the rim.
- Sealing ring misplaced or missing: the same result, often with a hiss.
- Too little liquid: the pot may burn-dry and stop with a warning.
- Inner pot not seated: the pot can rock or fail to heat evenly.
If a recipe came out underdone, the cause is usually the liquid or the release method rather than the time alone. Our step-by-step guide to how to use a pressure cooker covers the basics that apply to any brand, and the same logic carries over to how to use a Bella electric pressure cooker if you own that model.
Which Instant Pot should you start with?
Start with the Duo 6 Qt if you want the model most recipes assume. Its 7 functions and 13 programs cover pressure cooking, slow cooking, rice, yogurt, steaming, sautéing, and keeping food warm, and the Easy-Release switch keeps the final step simple.
For anyone learning how to use an Instant Pot pressure cooker, the useful order is water test, load, lock, seal, cook, release. Add the rack for steamed food and a spare inner pot once you cook several times a week.
If you're comparing other brands or sizes, our picks for the pressure cooker worth buying note which ones suit a first-time owner. Practice the water test twice, and the routine becomes automatic.
Frequently asked questions
How much liquid does an Instant Pot pressure cooker need?
Most recipes call for at least 1 cup of thin liquid such as water or broth, and some need more. The inner pot has half and two-thirds markings; never fill past the two-thirds line for pressure cooking, and follow recipe amounts for the dish you're making.
Why is my Instant Pot not coming to pressure?
The lid is usually not fully locked, the steam release valve is set to Venting, or the sealing ring is missing or seated wrong. Check those three things first, then confirm the inner pot sits flat on the heating element with enough liquid inside.
How long does it take an Instant Pot to build pressure?
Expect several minutes of heating before the float valve rises, longer with a full pot or cold food. The display often shows On or a countdown while pressure builds; cooking time starts only after pressure is reached, so plan extra minutes on top of the recipe time.
Can you open the lid right after cooking?
No. Release pressure first and wait until the float valve drops, which shows the pot is no longer pressurized.
Opening early can spray hot steam and food, so give it those extra moments even when you're in a hurry.